If you get a CCNA job, it is likely that you will manage a lot of switches. You will work a lot with VLANs, adapting the network to business needs. Since this could potentially eat all of your time, we can use some tools to make our job fast. VTP – VLAN Trunk Protocol, is one of the tools that Cisco offers for that. With VTP, we can propagate VLAN changes to all our switches in seconds. However, to do that we need to understand how the VLAN Trunk protocol works. If used in the wrong way, it can destroy your network. In this article, we are going to explain all the secrets to avoid that and use it safely.
This article explains to you how VTP works, and then teaches you the configuration with a lab. You can download, for free, the Cisco Packet Tracer lab about VTP by clicking on the link below.
Once you do, just open the Packet Tracer file (it is in a .zip archive) and follow the article. You will be able to try what you learn in this emulated network. In less than you might think, you will become completely confident with it.
Understanding VTP
A brief overview
The VLAN Trunk Protocol has a simple goal: VLAN propagation. In other words, it makes sure that the VLAN database is consistent on all your switches. You configure a new VLAN on a switch, and VTP adds it to all other switches. You delete it, VTP deletes it everywhere else.
To work, VTP relies on four items: domain, password, version, and revision number. We say that two switches are in the same domain if they share identical domain names, passwords, and VTP versions. Once two switches agree that they are in the same domain, they can start to sync their VLAN database. However, this is possible only on Trunks: two switches connected with an access link won’t sync.
How does the sync happen? This is where the revision number starts to play a key role. This is an integer that indicates how up-to-date the VLAN database is. The higher the revision number, the most up-to-date the database. Therefore, the two switches will check each other’s revision number, and the one with the higher one will push the database to the other. Every time you create, delete or modify a VLAN on a switch, the revision number on that switch increases by one.
A brief overview of the VTP operation.
By default, all switches are part of the “NULL” domain. If you don’t change it when deploying a network, you will expose it to serious threats. If you attach a switch with no VLAN to an existing network, and with a high revision number, it can propagate an empty database and erase your network.
VTP Modes
With VTP version 1 and 2, each switch can play three different roles: server, client and transparent.
- A switch in server mode will allow the administrator to configure VLANs (or modify/delete them). It will increase the revision number on each modification and propagate the database to other switches. This is the default.
- In client mode, the switch doesn’t allow the configuration of VLANs. However, it can receive VTP databases from servers and clients and propagate to the connected switches
- A switch in transparent mode doesn’t sync with other VTP switches, but it allows VTP messages to pass through it (and propagate to other switches, acting as a bridge)
The only difference between server and client mode is that you can configure VLANs only in the first. However, a client switch can update the VLAN database of a server if it has a higher revision number.
Considerations and Limitations
Recall your knowledge about VLANs. We can divide them in standard and extended range: respectively VLANs 2-1000 and 1006-4096. VTP, in version 1 and 2, can only propagate the standard range. This limitation, like many others, has been fixed in VTP version 3, which is out of scope for the CCNA as it adds more complexity.
Nonetheless, our major consideration is about how harmful VTP can be. If you attach a new switch to the network, that for any reason happens to have a higher revision number, it will propagate its VLAN database. You don’t want that. So, before attaching a new switch to a network you need to set its revision number to zero. However, Cisco hasn’t created a command for that. Instead, we need to force it into transparent mode and then back into client/server mode. This will effectively reset its revision number.
It is also worth mentioning that VTP only propagates VLAN configuration. You will still need to connect on each switch and manually configure the ports you need.
Configuring VTP
For this lab, we are going to start with the configuration of the Top switch. As you can guess from the requirements, it must be the server. We will need to define its domain, password, and version, as well as the mode. Instead, the revision number will automatically increase as we configure VLANs.
So, we can start that easily by entering the global configuration mode. From there, we can use vtp domain to set the domain, vtp password to set the password, vtp version for the version and vtp mode for the mode. Here’s a complete list of what we have to type.
vtp domain company
vtp password ictshore
vtp version 2
vtp mode server
You now have configured the server. We will come back to that at the end to configure VLANs. The client configuration is identical, it only changes the VTP mode as specified below.
vtp domain company
vtp password ictshore
vtp version 2
vtp mode client
We need to push this exact configuration on Left, BottomLeft, and BottomRight switches. Now our VTP configuration is almost at the end, we only need to configure the transparent switch. Since it is transparent, it won’t need to know the domain nor password. We can simply add vtp mode transparent on Right switch.
Preparing the VLANs
For this lab, we were asked to create three VLANs: 10, 20, and 30. We need to name them “Data”, “Voice” and “Servers”. You should be able to do it on your own, but in case you don’t, we prepared the copy-and-paste commands here.
vlan 10
 name Data
vlan 20
 name Voice
vlan 30
 name Servers
Add these commands on the server. In a few seconds (at most), VLANs will be created on all the switches but Right (which is transparent). You can verify that with show vlan brief. Congratulations, you now have configured VTP! Your score should be 100%.
Troubleshooting VTP
When working with VTP, there’s almost nothing to troubleshoot. Instead, it either works or doesn’t work – in the worst case it can blow up your network, but you know it’s because of revision numbers. Nonetheless, Cisco offers us a great command to check the overall VTP configuration of our switch: show vtp status. In case you finished the lab, as we did, here’s the output we expect to see on “Top”.
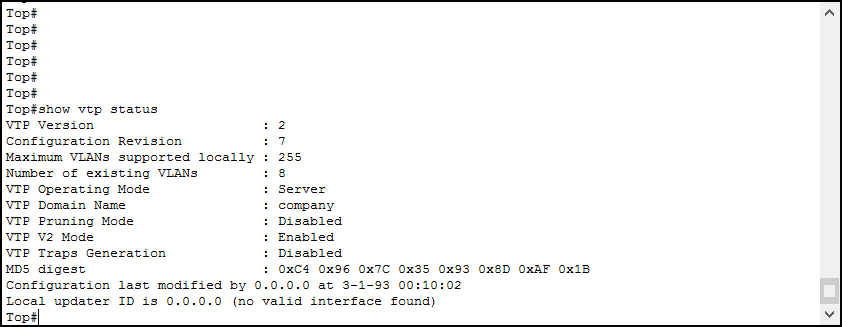
As you can see, we can have a pretty good overview. It shows all the configuration parameters, as well as the existing VLANs and how many VLANs our switch can support (255 in this case). Furthermore, you can see when was the database modified the last time.
Conclusion
VTP – VLAN Trunk Protocol, is an awesome tool to do better and faster configurations. While configuring it is easy (you have all the commands starting with vtp), understanding it requires attention. Nevertheless, in this article, we covered everything you need to configure it.
- VTP modes define how the switch works when interacting with other switches (server and client propagates and install updates, transparent propagates updates but doesn’t install them in its database)
- Switches can exchange updates only on trunks and when they have the same domain, password and version
- Never use VTP in a Data Center, in case something goes wrong you will take it down
With this knowledge, you are ready to jump-start in Switch Configuration, being faster and efficient. Furthermore, you are now ready to face more complex switching technologies like STP.